
(* These are recaps of our “Hidden Apron at Home” Instagram Live sessions filmed under quarantine and held on my @errant_diner account. I focus on the fundamentals of cooking as I, a non-chef, understand them. They are based on my experiences learning how to cook and deal with systems and ways of thinking vs. just recipes. This fourth session is part of a longer series addressing the Motivation – or lack thereof – to cook. This one deals specifically with Flexibility. Click here for recaps of Part 1: Confidence, Part 2: Efficiency, and Part 3: Flexibility)
IG Live Recording can be found below and you can find the Menu Planners and a more in-depth explanation of how to set them up in this post I wrote back in 2015. Note that since this was on Instagram Live, this is best viewed on mobile and at full screen. My roommate coincidentally chose to teach a workout class at the same time so please forgive the chaos and enjoy the quarantine-induced hilarity towards the latter half!
The Lesson
For this past month, we’ve been addressing the multiple factors that stop someone from cooking that often take place before you even enter the kitchen. Having the confidence to approach an unfamiliar dish, the efficiency to make meal preparation less of a drag, and the flexibility to adapt recipes to changing conditions are all critical pieces to consider for any cook. This week, we’re addressing a fourth reason keeping many from cooking: Creativity.
Creativity is a loaded word that we often associate with starving artists and child prodigies. We often think that creativity must be some innate quality and that some of us just aren’t born creative. If we mistakenly consider ourselves from the latter group, we must think that we can’t possibly do the things the stereotypical creatives do: cook, draw, paint, dance. I myself thought so and so it didn’t strike me as strange that I started my career in Accounting. But what is Accounting but the creative moving around of pretty much imaginary numbers? Did you know that it actually takes quite a bit of creativity and persuasion to classify something as a revenue at times and armies of accountants can magically make them disappear so as to lower their tax burden?

Photo Credit: Kurt Belen
On the flip side, the “creative arts” are governed by rules and limitations though because they aren’t as spelled out as Generally Accepted Accounting Principles, they are bestowed some air of mystery. When it comes to cooking, I can definitely say that by applying some simple exercises done on a piece of paper, you too can get creative with your culinary escapades. These exercises force our brains to look at certain ingredients, flavors, colors, and other attributes from different angles so that we’re not narrowing down on a single recipe. Think of it like reassembling Lego blocks! Here’s how it works:
- Draw Boundaries
While we at Hidden Apron have always rallied under the phrase “Break Bread, Break Boundaries”, boundaries and parameters are useful when starting out if only to show you which limits you can push. These boundaries are the attributes of a dish and are completely arbitrary. One way to think of it is across the Five Senses:- Sight – Color, Shape, Structure
- Smell – Top Note, Bottom Note
- Sound – Amount of Sizzle, Crunch
- Taste – Temperature, Spice Level
- Touch – Texture
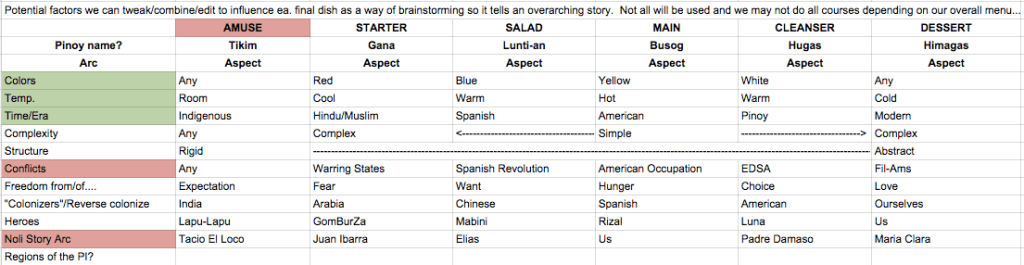
These boundaries could even stray into the abstract. One parameter we liked used to use was “Era” (Pre-Colonial, Spanish Occupation, OFW surge, etc.) and lately we use “Base Filipino Dish” a lot to provide the foundation from which to play with. By changing the variables within these boundaries like you would the Lego pieces within a larger structure, you can create entirely new dishes!

- Check for balance and cohesion
If you only happen to be playing with a single dish, tweaking variables can be quite simple (what would a Green Risotto look like instead of the usual yellow Milanese? How would one make “hot” Ice Cream? Can a stew be crunchy? … you can see all the fun possibilities right?). When creating a multi-dish/course menu however, you also want to make sure that the variables you’ve chosen to tweak play well with each other. Have you inadvertently made the whole menu a boring brown even if they all taste different? Are you OK with that? Have you made everything technicolor at the expense of good taste? Perhaps there’s too much meat and complex plating on the menu. I can’t count the number of times we’ve failed and succeeded based on how much time we spent making sure we have components that make sense together.
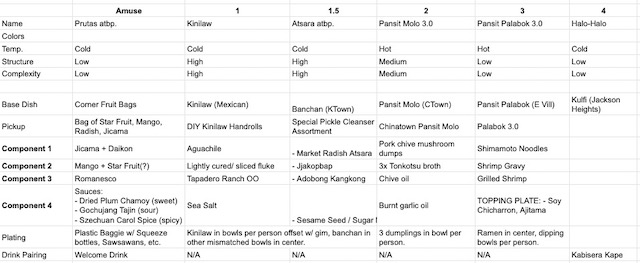
For many cooks, this might seem completely obvious and that’s fine! But for the rest of us who struggled with the vague feeling of “something’s missing”, these explicit exercises help you push creative boundaries by making them visible.

- Co-create
One of the most powerful aspects of using these techniques when planning dishes and menus is the opportunity to collaborate with others be they your fellow cooks or your guests. By allowing your cooks to help define parameters, make their own tweaks to the variables, and write their own interpretations within your defined boundaries, you’re giving rise to shared menus that are greater than the sum of its individual dishes. You can also use these as an opportunity for the guest to participate in the creative experience beyond just being diners!

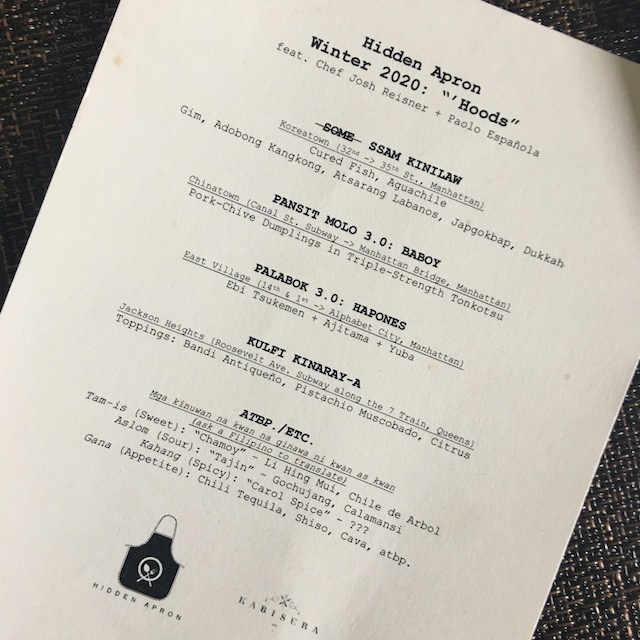
For one of our pop-ups, we took the literal translation of a beloved Filipino dessert, the Halo-Halo (“Mix-Mix”), applied the unconventional approach of the artist Sol LeWitt*, and let the guests decide how they should be plated based on some arbitrary rules. You’d be surprised how many ways Halo-Halo can be reimagined and the feeling of ownership people have if you bring them along the creative journey with you.
*Check out LeWitt’s approach to his “Wall Drawings” and notice how he leaves the actual drawing to people other than himself!
The Food
Piña Colada Milk Punch (based on Punch’s recipe)
1) Heat 3 oz. of milk in a pan until steaming but not boiling. Take care not to burn the milk.
2) Mix 8 oz. of dark rum (I used Cachaça actually), 4 oz. of coconut water, 0.5 oz. of ginger syrup, 2 oz. of velvet falernum (or just use more syrup), 2 oz. of pineapple juice, and 1.5 oz. of lime juice in a heatproof bowl.
3) Mix the hot milk into your rum mixture and let stand for at least 15 minutes. The acid from the limes and pineapple will react with the milk to form curdles. These curdles will trap impurities and when strained, will produce a much clearer cocktail that you can then store.
4) Strain with a cheesecloth (I used a chorreador or coffee sock).
5) Serve on a big block of ice with pineapple slices (I used candied sorrel).
Salmon En Papillote
1) Preheat oven to 375F.
2) Place salmon in the middle of parchment paper.
3) Season all slides with salt, pepper, and preferred acid. My mom used apple cider vinegar but I opted for leftover blood orange and lemon juices. Add a glug of EVOO and herbs like tarragon if you’d like if you’d like. The liquids will steam the fish while infusing it with a nice, bright flavor.
4) Fold the parchment paper and twist both ends like a giant candy wrapper and cook in oven to desired doneness. I cooked mine for about 10 minutes which was long enough for the center of a 4 oz. fillet to no longer be raw.
Quasi-Arancini…aka “Quarancini”
1) Prepare two separate plates of flour and hand-crushed/blended panko. You will use these to coat the Risotto. In addition, fill a bowl with one beaten egg or milk if you don’t happen to have an egg.
2) If you happen to have mozzarella (which I didn’t), cut a small cube and press it into the ball you’ll form in the next step so you’ll end up with a nice, gooey center of cheese after frying.
3) Roll the risotto into a golf ball-sized sphere and roll over flour until coated. Dip into egg and then onto panko. The egg is mainly there to bind the ingredients onto the risotto ball but since I only had a single egg and was not willing to part with it + my risotto was already quite wet, I found that I didn’t need any additional dairy and just went straight from flour to panko.
4) Fill a skillet with enough oil to come up to half of the risotto ball at the very least. Bonus if you have enough oil to fully submerge the balls or a deep fryer. Heat the oil and make sure it’s hot by dropping a piece of panko in and watching for it to rise and fry instead of sinking to the bottom of the pan.
5) Fry your risotto balls, flipping over once golden brown.
Carrot Atsara
1) In a small sauce pot, heat about a cups worth of vinegar. Add the desired amount of sugar. I find most atsara to be cloyingly sweet to me bordering a 1:1 vinegar to sugar ratio so I only put about 2 2) 3 tbsps in. I also like the spices of my childhood so I usually add some cardamom, cloves, black peppercorns, cinnamon, and cumin.
3) Using a Y Peeler, peel the carrots. Continue using the peeler to cut thin, long strips of carrot occasionally rotating the carrot to keep the same approximate width.
4) Chop some red onion into strips and ginger into sticks if you’d like.
5) In a large heatproof bowl, mix the vegetables together and pour in the hot vinegar mixture. Mix well and let stand till cool. You can continue to let it stand at room temperature overnight if you’d like or refrigerate it.
6) Serve with any rich/greasy/fatty food that needs a burst of acid to cut through it.
